
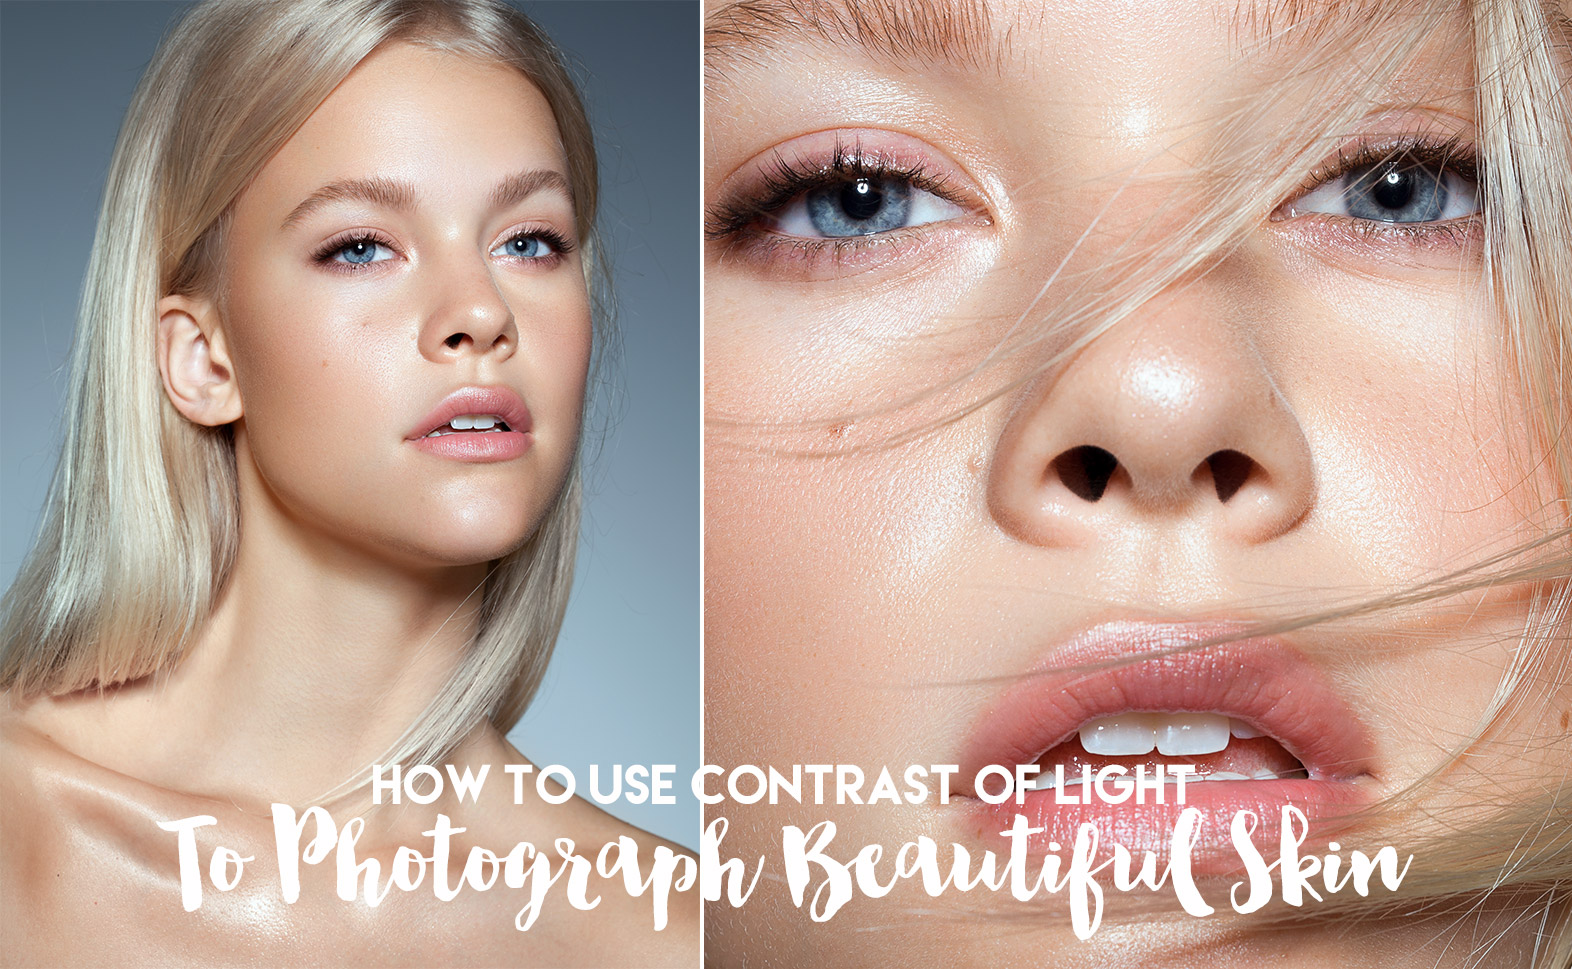
Lighting Lesson: How To Use Contrast of Light To Photograph Beautiful Skin
Light is the essence of photography.
It is the first thing anyone who is even remotely interested in photography should master. And if you’re planning to work in a studio using artificial lighting, you must understand light behavior to be able to control it well.
Light is energy radiated from a source that falls on an object and photography is simply the recording of light on film or light sensitive sensor.
Light affects everything in photography and I’m sure you already know what qualities of light are and how they affect your images. A lighting master knows very well how all of these qualities can be altered using various tools in theory, and applies this knowledge when working in a studio to artistically manipulate light:
- Color: we can change color using color filters and gels
- Direction: we can alter it’s direction by reflecting it
- Hardness: we can diffuse it using various light modifiers and filters
- Intensity: we can increase or lower strobe power, and also concentrate light using various light modifiers and grids
- Distribution: we can limit it by subtracting it with a dark area (surface, object)
There’s one more very specific quality of light that I’d like to talk about today – it’s its Contrast. I don’t see it discussed as often as it should be in educational articles or video tutorials on the web, so I wanted to bring it to your attention.
I’ll try to make it short and visual, and then also share a little video excerpt from my Go Pro: Studio Beauty video course where I will give you a little assignment for the next time you’re in the studio so you can test and see it for yourself.
The Inverse-Square Law For Light
First of all, the boring stuff that every photographer must study and know by heart: the Inverse-Square Law for light. It is fundamental knowledge and while it’s something we as humans have all been observing during our years on this planet, it’s good to put it in words and keep in mind every time you shuffle your strobes around the studio attempting to achieve a beautiful light pattern in your images.
So in short, if the distance between the light source and a subject is doubled, a given area receives only one-fourth as much light; if the distance is tripled, only one-ninth:
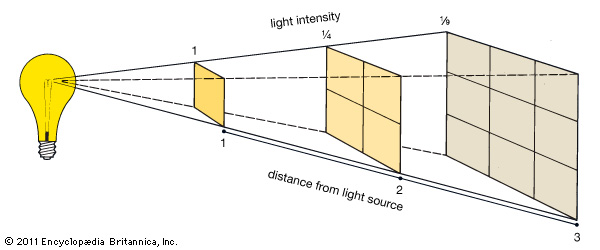
In other words, the amount of light that will reach the same subject/surface is inversely proportional to the square of the distance from the light source.
First takeaway that is important for you as a photographer is that if you want to illuminate a larger area with the same light source – move it away from that area.
And second, as you move the light source away, the area that you’re attempting to illuminate receives less light, and you will need to compensate and increase the strobe power to achieve correct exposure.
But how do you know how much light to add?
This formula can be simplified too.
I am sure you already know: when you double the amount of light on your strobe – you increase it by one stop of light, or add an F-stop.
When you half the amount of light on your strobe by lowering its power – you decrease it by one F-stop.
So, if you found the correct exposure (explained in Chapter 3, Video 00 Starting Point of Go Pro: Studio Beauty) then doubled the distance between the model’s face and the light source, the model’s face is now receiving 1/4 of the light that it should for correct exposure. Which means you will need to double the amount of light twice – or add two F-stops – to ensure that the model’s face is receiving the same amount of light as it did for correct exposure.
Here’s an example: if there’s 1 meter (or 3′) between the model’s face and your light source, and you want a larger light fall off in your shots, so you move your strobe away, and now there’s 2 meters (or 6′) between the model’s face and the strobe – you will need to add 2 full stops of light on your strobe, or open up your aperture by 2 F-stops, whichever is more appropriate for your shots. And if, for example, you only need to move the strobe 1/2 meters away from the model, you will only need to add 1 stop of light on your strobe to compensate for the distance, and so on.
Contrast Of Light
So, now that the confusing Inverse-Square Law is out of the way, let’s talk about the actual topic of this article.
How to control the contrast of light to achieve beautiful highlights on skin that make it look fresh, youthful and alive.
For starters, harder light will always create “crispier” highlights on anything that has a reflective surface, including human skin. So if you want to increase the brilliance of the highlights in your shots use the light modifiers that create harder light (this is also explained in detail in my Go Pro: Studio Beauty video course and the digital book).
Then, the natural characteristic of your model’s skin, and, even more so the makeup applied by your Makeup Artist, will increase or decrease the highlights created by frontal lighting.
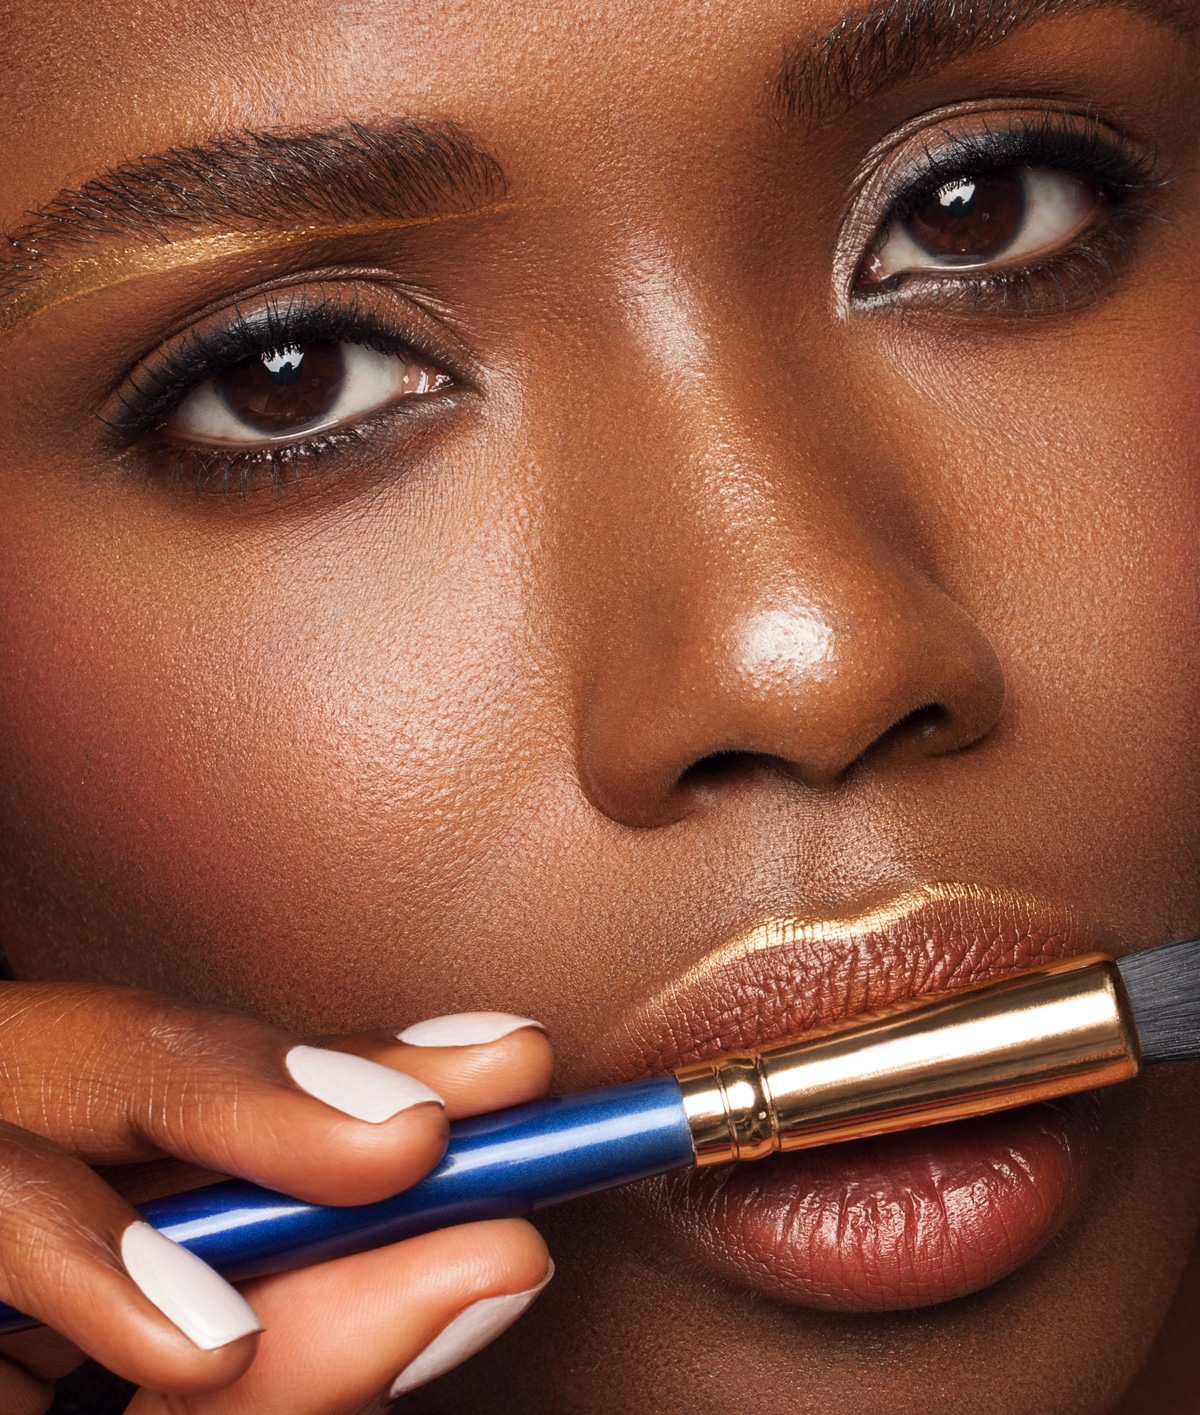
Model Porsche of NTA Models, Los Angeles, Makeup by Vlada Haggerty, photo & post Julia Kuzmenko
And lastly, it’s the distance between the model’s face and the light source that can either emphasize the highlights or wash them out.
VISUAL EXAMPLE
Here’s a quick example photographed by my co-author of our video course Alexey Dovgulya: Alex took the first test shot with correct exposure while the light source (Beauty Dish) was set 1 meter (or 3 feet) away from the subject (the photographed Profoto strobe).
Then he moved the light source roughly 1 meter away from the subject – doubled the distance – then compensated its power like I explained above, and took a test shot #2 at 2 meters distance between the light source and the subject.
Then he moved it 1 more meter away, compensated the power and took the last test shot #3 at 3 meters.
Now watch how the distance between the light source and the subject affected the highlights in these 3 test shots, even though the strobe power was adjusted to compensate for correct exposure:
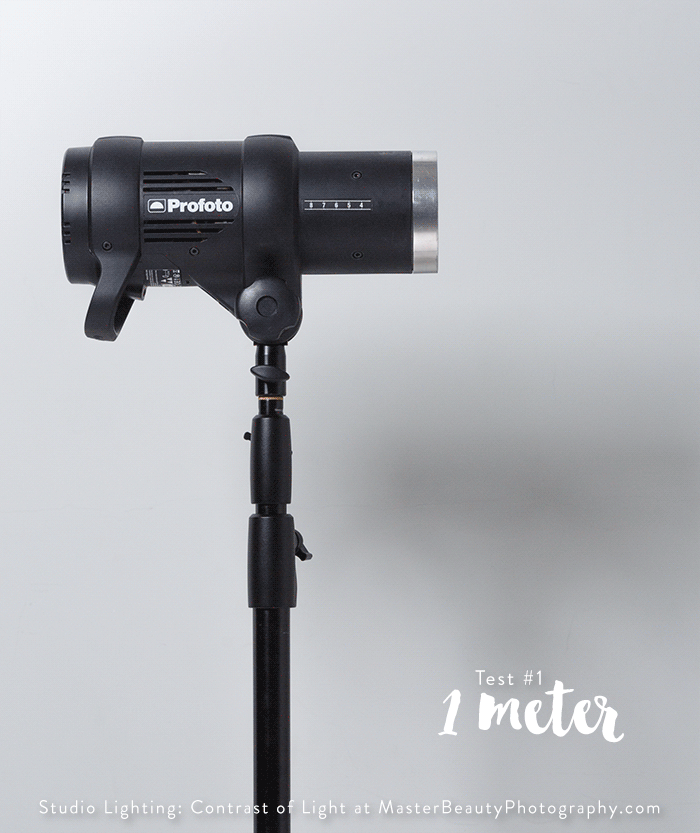
The difference in the highlights appearance caused by the distance between the light source and the subject.
It’s a significant difference in the appearance of the highlights considering the same amount of light is reaching the subject. In similar fashion, the brilliance of the highlights on the skin of your models dissipates when you move your strobes away even if the exposure is correct in your shots.
This and many more studio lighting-related things are explained in our video course, and I took the liberty to share a little excerpt from it to complete this topic today, so you can walk away with a better understanding of light contrast and how the distance between the subject and the light source can affect the look of the skin in your Beauty, Fashion and Portrait images:
Hope this was helpful and you are inspired to test this in the studio, and if you do, please share your test shots with us!
Till next time!
Featured Image: Model Katya of NOUS Models, Los Angeles, Makeup & hair by Lupe Moreno and assistant Nicolette, photo & post Julia Kuzmenko.


Very helpful.
Thanks!
It’s my pleasure, Elbert! 🙂
Great example with the strobe! Very easy to see the difference there.
Thank you 🙂
A great lesson from a wonderful video course. I just wished I hadn’t purchased it when it was still priced at $199-lol.
Thank you Paul! But you had it months before those who waited for the discounted price!
Hope you used this time wisely and practiced what you’d learned 😉
Always great information, Julia. Love your work.
Thank you Oxana 🙂
In the main photograph used in the heading of this article, would the distance be at 1 to 2 meters based on the highlights on the models skin? Thanks.
Hi Harold,
Correct, it was about 1 1/2 meters 🙂
I started to wonder about the shadows on the wall. Usually longer the distance, more contrast and pronounced shadows. However this is not so obvious here. Any explanation for that ? 🙂
Janne, yes you’re right – usually the greater the distance between the light source and the subject, the harder the edges of the shadows will be. But you also need to take into account the reflected surfaces around the subject. In this case the white studio walls caused the light to bounce and fill in the shadows of the subject. Also the distance between the subject and the surface on which the shadow is cast affects the appearance of the shadow.
Julia hi,
Thank you for this article.
I think I understand the logic behind the relationship between the distance of the light and its contrast, but I am having trouble connecting it in a meaningful way to the the concept of “the bigger the light source in relation to the subject, the softer the light”.
I mean, if reducing the distance creates a softer light (softening the transition between luminosity values) then how does it increases contrast at the same time? I am having a hard time combining the two concepts mentally.
Could you please help?
Thanks a lot!
Great work Julia & Alexey, so thankful.
would you suggest 22 inch beauty dish or a 28 inch
Very good post .Thank you for lesson 🙂
Great post too! Can the light be “too close” and what happened when the light is too close? Too much highlights everywhere on the skin?